Tuesday, June 21, 2011

No-Sew Napkins!

I'm not sure about any of you, but I don't mesh well with sewing machines. In fact, my last run in with one ended with me literally throwing it across the room into the closet door. True story.

So, when I decided that I wanted to MAKE, yes make, all of my napkins for my wedding in October, my skin was crawling at the idea of having to sew 250 napkins. I had originally purchased some polyester blend napkins but thought they were too plain. I've decided to buy 4 different prints in the same color palette to add some color to the white and burlap covered tables.

I haven't chosen the colors that I want yet, that's still a work in progress. Before I do that, I had to make sure that this was a do-able task. So far, so good!

Here's what you'll need:
~ Rotary Cutter (optional)
~ Cutting Grid (optional)
~ Pinking Shears with a decorative edge
~ Fabric

What I did was bought a few fat quarters from the local fabric store. This way, I could test this project out without having a ton of leftover fabric. Before starting, I washed, dried and ironed the fabric. So, I decided what size I wanted my napkins, roughly 17 inches square.


I used the rotary blade cutter to cut my fabric to size, leaving an extra 1/4" inch for the decorative edge. If you can cut in a straight line, by all means, skip this step! I however, cannot cut in a straight line to save my life. I tried doing this without the rotary cutter and grid but I ended up with trapezoid looking napkins, no bueno!

After trimming all of the sides to size, I used the pinking shears along the edges to give it a nice decorative edge and to keep the napkin from fraying! I found that it's easiest to fold the fabric in half so that you have the same cuts on each side but it's a personal preference.


Only 250 to go...I think I can handle this...maybe! ha-ha I hope everyone has a great day!

Thursday, June 9, 2011

A Little Shameless Etsy Promoting.... :)

Hello my blog followers (all 3 of you, myself not included) and welcome to anyone viewing for the first time. With the recent death of someone very near and dear to my fiance and myself, I haven't had the time to get my craft on like I would like.

In lieu of a craft post, I would like to offer you all a coupon code for my Etsy store. If you like what you see, please feel free to click on my link in the right hand column and see what I have for sale in my store, AliHCreations.

For a limited time I'm offering a 10% discount to all shoppers that follow me on Facebook or that follow my Blog. All you need to do is enter the code, 10PERCENTOFF during checkout for a new, updated total.

Thanks so much and I hope you all hug and kiss your loved ones. Cherish every moment you have because we truly don't know when it will be our last. xoxo

Thursday, June 2, 2011

Baby Shower Invites

If you're like me...you currently have at least 10 friends that are pregnant right now. They seem to go in spurts, it will be quiet for awhile and then out of nowhere, you'd swear everyone you know is expecting. It's so exciting but I can only imagine how overwhelmed they are all feeling.

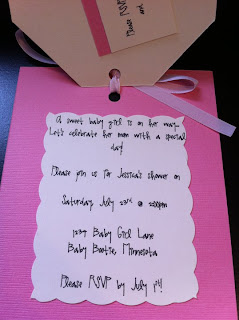
In the spirit of many of my girl friends expecting, I spent a few hours today crafting Baby Shower Invitations. I think they turned out super cute, although I will admit, I am a bit biased! For a tutorial, please see my previous days post. This is in addition to that post, just some more varieties to what I did with my Groom's Dinner Invitation. And now, they are all available on my Etsy Shop...AliHCreations.

Baby Boy Invitation


Baby Girl Invitation


Happy Thursday! It's almost the weekend!

Wednesday, June 1, 2011

Something Blue...Groom's Dinner Invites

I'm not afraid to admit that I am a bit of a procrastinator, ok a REALLY big one! I realized this morning while wiping down the dry erase board for the new month that we are a mere 4 months from the wedding. To be honest, October still seems like years away but if I've learned anything as  I grow older it's that time flies!

So, I've decided to tackle my groom's dinner invitations. I'm still waiting on the pocket folds from CardsandPockets.com to do my actual wedding invites so I will make do with what I have for now.

There are some things you should know about our wedding. Firstly, it will in no way, shape, or form be traditional. We are getting married at a ranch on the outskirts of the city limits. All of our guests will be brought to the ceremony site being held in the woods via horse drawn sleighs. Instead of chairs for the ceremony, there will be covered hay bales. Our dog, Dozer, is the ring bearer and I will be wearing my cowboy boots with my dress.

We are NOT doing the traditional 1 or 2 color options, instead we are using a pallet of autumn colors. Deep burnt oranges, mustardy yellows, Merlot reds and olive greens. Because of this choice, I have decided that the grooms dinner invites as well as the bachelor party invites need not follow a color scheme either. For them, I've chosen a mix between Kraft brown and cream and then also, oasis blue. I've completed a mock-up and extremely excited at how they turned out!

The hardest part was figuring out how to word the invitations because, in keeping with the non-traditional theme, my parents are hosting the grooms dinner, not his. After I tackled this mountain, the rest came pretty easily.


Originally, I wanted to do a different shape for the first layer but after some Internet searching and about 10 minutes cutting the shape one time with scissors, I passed and went for a simpler, "tag" look for the first layer. On the back side of the tag, I created a pocket for the RSVP information. In order for the guests to send it back as a post card it needs to be at least 3 1/2" x 5" so I chose to include the information that I would like from them as well as my email address on this insert. I wouldn't dream of having people RSVP for the actual wedding but I think I can get away with it since most people don't even send a formal invite for the grooms dinner.


I attached the event information to the oasis blue card stock cut to approx 3 1/2" x 5 1/2" and attached it all together with a matching ribbon. Simple, informational and in my opinion...adorable!


I hope everyone enjoyed their weekend, I know I did. Nothing like family time to help you remember what's truly important in life...quiet time alone (ha ha, I'm only kidding)!

Time to make more invites. I would love feedback on them as I'm trying to decide whether or not to make a template and load them into my Etsy store.